This article contains affiliate links. We may earn a commission on purchases made through our links, at no additional cost […]

This article contains affiliate links. We may earn a commission on purchases made through our links, at no additional cost to you.
Quick Summary: How to Apply Lash Clusters
- Learning how to apply lash clusters correctly comes down to two things: applying with your eyes open, and never skipping sealant. Everything else is practice.
- A complete DIY lash extensions kit needs four things: clusters in multiple lengths, bond, sealant, and tweezers.
- Apply bond to your natural lashes from outer to inner corner. Wait 30 to 60 seconds until tacky before placing any cluster.
- Always apply with eyes open, looking straight ahead. Placement done with eyes closed produces the wrong angle once your eyes open.
- Start at the outer corner. Work inward. Add inner corner clusters last, and use fewer than you think you need.
- Sealant applied over the cluster bases after placement is what makes them last 5 to 10 days. Without it, most people lose clusters within 48 hours.
- Remove with an oil-based remover only. Never pull clusters off dry.

A full salon lash extension set costs $100 to $200. Fills run $50 to $80 every two to three weeks. That’s over $1,000 a year to maintain a look you can recreate at home in 15 minutes with a $14 lash cluster kit.
That math is why DIY lash extensions have taken over. The r/lashextensions community is full of people who made the switch and stopped going back. TikTok tutorials under #DIYlashes have racked up millions of views. Amazon’s “lash cluster” category is pulling over 11,000 weekly searches and climbing.
“I see a lot of girls get frustrated because their clusters don’t stick and they have the pressure of these content creators making it look so easy but really they are not showing what is being used behind the scenes.” — Lemon8 beauty community
That’s the problem this guide solves. Here’s everything you need to know about how to apply lash clusters from scratch: what to buy, exactly how to place them for your eye shape, how to make them last, and how to take them off without losing a single natural lash.
What You Need Before You Start
Most Amazon lash cluster kits include everything in one box. Before buying, confirm these four things are in it:
- Clusters in multiple lengths. You want at least three lengths — short, medium, and long — to customize from inner to outer corner. Most kits include 10mm, 14mm, and 16mm to 18mm options.
- Lash bond. This is the adhesive that attaches clusters to your natural lashes. It’s different from strip lash glue. Bond is designed to hold for days, not hours. Confirm your kit includes it.
- Lash sealant. Applied over the bond once clusters are placed. This is the step most beginners skip, and it’s the main reason clusters fall off early.
“There are several reasons why your at-home lashes may have poor retention: improper application, low-quality products, or poor maintenance.” — TikTok lash community. Sealant fixes the most common of those three.
- Tweezers or an applicator. Most kits include one. Angled tweezers work fine if not.
You’ll also need a handheld mirror, good lighting, and a completely clean, dry eye area. Remove all eye makeup, moisturizer, and oil before starting. Oil breaks down lash bond faster than anything else.
“Oil-based products near the eyes can weaken the adhesive.” — Lash community, evergreen guidance.
How to Apply Lash Clusters Step by Step
Total time: 15 to 20 minutes for your first application. Faster every time after.
Step 1: Sort your clusters before you touch anything else.
Lay them out in order: longest for the outer corner, medium for the center, shortest for the inner corner. Having them organized before bond goes anywhere means you’re not hunting for the right cluster while adhesive is already tacking on your finger.
Step 2: Apply a thin layer of bond to your natural lashes.
Work from outer corner to inner corner, starting at the lash base. Let it tack for 30 to 60 seconds until it’s slightly sticky but not wet. This waiting window is the step most video tutorials rush past. Wet bond lets clusters slide. Tacky bond locks them. “Applying glue to the whole lash line at once” is one of the most commonly cited beginner mistakes across the lash community — section by section is slower and more reliable.
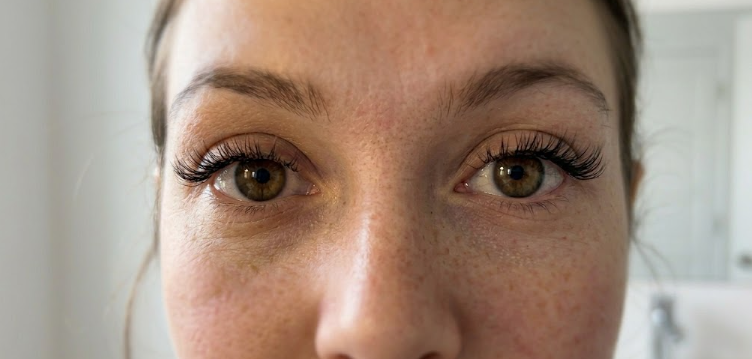
Step 3: Pick up your first cluster and start at the outer corner.
Use tweezers and grip the cluster by its base band, not by the lash tips. The outer corner is the most visible zone and sets the angle everything else follows. Getting this right first makes the rest of the lash line easier to read. “Focus on the outer corners first — the outer corners tend to be more sparse and have fewer natural lashes.” — Lash placement community, evergreen.
Step 4: Apply with eyes open, looking straight ahead.
Not looking down. Not with eyes closed. Eyes open, looking straight ahead into a mirror. The placement angle changes significantly when your eyes are closed versus open — clusters placed with eyes closed will sit at the wrong angle once your eyes open. This is the most consistent beginner mistake reported across community threads.
Press the cluster base against your natural lash line, slightly above the root of your natural lashes. Clamp lightly with tweezers or press with a fingertip for 10 seconds. Then gently push the cluster upward with your tweezers to help it set — clusters are heavier than individual lashes and can droop if not supported while bonding.
Step 5: Work inward from the outer corner.
Place medium-length clusters across the center of the lash line. At the inner corner, use your shortest clusters — and use fewer than you think you need. The inner corner is the most over-done zone for beginners, and heavy inner corner placement makes the eye look weighted down rather than open. Two to three small clusters at the inner corner is enough for most eye shapes.
Step 6: Let bond dry for two minutes before touching the lashes.
Resist the urge to adjust. If something looks slightly off, wait for the bond to fully set before correcting it. Adjusting too early while bond is still wet is how clusters end up crooked or bunched.
Step 7: Apply sealant over the cluster bases.
Run the sealant along the lash line, working over the base of every cluster. This is what locks the bond and protects the set. Without sealant, most people lose clusters within 24 to 48 hours regardless of how well they applied bond. Let sealant dry completely before touching your lashes again.
Step 8: Check the full lash line with eyes open.
Step back from the mirror. Assess the full shape. If one zone looks heavier than the others, note it for your next application. First sets rarely need adjusting once bond and sealant are dry. The shape reads differently from a distance than it does up close.
How to Apply Lash Clusters by Eye Shape
Here’s where the practical advice gets genuinely split, and both camps are right, for different readers. One camp says the step-by-step above works for most people on a first try and you don’t need to overthink placement. The other says eye anatomy governs where clusters land when your eyes are open, and skipping this step is exactly why beginners end up frustrated and throwing the kit away.
If your first application felt off and you couldn’t work out why, this section is for you.
- Hooded eyes. When your eyes are open, the outer corner clusters can disappear under the lid fold. Avoid placing your longest clusters at the far outer edge. Concentrate length in the center of the lash line and keep outer corner clusters to a medium length. Placement slightly above the very outer corner root will be more visible once eyes open. A doll-eye map — longest clusters centered over the pupil — is often more flattering than a cat-eye map on hooded lids.
- Downturned eyes. Focus length and density slightly above center. Angling outer corner clusters very slightly upward before pressing into bond creates a mild lift at the outer corner. Cat-eye maps work particularly well here because they counteract the natural downward tilt.
- Almond or standard eye shape. You have the most flexibility. All lengths work. Concentrate longest clusters at the outer third for a dramatic effect. Concentrate at center for a doll-eye look.
- Monolid. Apply clusters slightly higher on the lash line than feels natural — closer to the upper lash root and angled outward. This increases visibility of the lash above the lid line when eyes are open.
- Round eyes. Elongated cat-eye maps work well — shorter clusters at the inner corner, graduating to longer at the outer edge. This creates definition and prevents the eye from appearing rounder.
One note on skin tone and lash selection: deeper skin tones may find that very dark brown or black clusters blend more seamlessly than synthetic jet-black fibers, which can read as costume-adjacent on rich melanin tones. If you have very deep skin, check whether the cluster fibers are matte or glossy. Matte tends to read more naturally across a wider range of complexions. This guide hasn’t personally tested across every skin tone at the product level, and that limitation is worth naming.
For more eye shape-specific techniques, visit our full eye makeup tutorial hub.
The Best Lash Cluster Kits for Beginners
Here’s what I’d recommend if you’re starting from zero. These picks are based on community-verified performance from r/lashextensions threads and TikTok tutorial data. They are not independently wear-tested by this publication under controlled conditions — that transparency matters.
[AAWP: Mayhug Cluster Lash Kit]
The Mayhug kit (approx. $8 to $12) is the lowest entry cost with bond and sealant included. Multiple lengths in the box. The most consistent community recommendation for a first lash cluster kit.
[AAWP: COFIER Glueless Cluster Lashes]
The COFIER kit (approx. $10 to $15) has a slightly more flexible band than Mayhug. A better pick for first-timers who find rigid bands harder to control during placement. Bond and sealant included.
[AAWP: Quyen Lash Cluster Kit]
The Quyen kit (approx. $12 to $18) is the community favorite for multi-use. Clusters can be cleaned and reapplied. Higher cost, longer total use life.
[AAWP: Ardell Individuals]
Ardell Individuals (approx. $6 to $8) are a lightweight individual cluster option. The right starting point if you have fine or sparse natural lashes — lower weight than full cluster bundles and available at most drugstores without waiting for shipping.
[AAWP: Linx Cluster Lash Glue]
If you need to replace bond separately, Linx (approx. $10 to $14) is the most consistently recommended standalone bond across community threads.
For a full comparison of eye products with tested performance data, visit our best eye makeup guides.
How Long Do DIY Lash Extensions Last?
With proper bond and sealant application, most people get 5 to 10 days of wear from a DIY lash cluster set. The r/lashextensions community reports a wide range — some users consistently hit 10 days, others find 5 to 7 is their reliable window.
What extends wear:
Starting with a completely oil-free eye area before application is the single biggest retention factor. Applying sealant every two to three days after the initial set keeps the bond protected. Sleeping on your back or using a silk pillowcase reduces friction. Avoiding oil-based eye makeup remover on the lash line while clusters are on prevents bond breakdown.
What shortens wear:
Oily eyelids are the most common culprit. A lash primer applied to the lash line before bond helps significantly. Skipping sealant is the second most common cause of early loss. Rubbing eyes aggressively and steam or heavy humidity in the first 24 hours after application both compromise the bond before it fully cures.
How to Remove DIY Lash Clusters Without Damaging Your Natural Lashes
Removal is just as important as application. Pulling clusters off without proper removal is the primary way people damage natural lashes.
Apply an oil-based eye makeup remover or micellar water with oil content to a cotton pad or spoolie. Hold the soaked pad against your lash line for 30 to 60 seconds. Let the oil dissolve the bond before doing anything else. Then gently slide clusters off from the inner corner outward. They should release without resistance when the bond is fully dissolved. If you feel any pulling, add more remover and wait another 30 seconds.
Never pull clusters off dry. “Do not pull. If the lash clusters don’t immediately slide off, apply more remover and wait.” — Velour Lashes application guidance.
Can lash clusters damage your natural lashes?
Used and removed correctly, cluster lashes don’t cause lasting damage. The main risks are dry removal (pulling clusters off without dissolving the bond first is the primary cause of natural lash loss), weight overload from very long or heavy clusters on fine natural lashes, and bond applied against the skin rather than the lash root. If your natural lashes are fine or sparse, start with Ardell Individuals for lower weight.
Common Mistakes to Avoid
Skipping sealant. This is the single biggest reason clusters fall off early. Sealant is not decorative — it locks the bond and extends wear by days.
Applying with eyes closed or looking down. Placement done with eyes closed produces the wrong angle when eyes open. Eyes open, looking straight ahead, every time.
Starting at the inner corner. The inner corner is the hardest placement zone. Start at the outer corner, work inward, and add inner corner clusters last.
Over-loading the inner corner. Two to three small clusters at the inner corner is enough. More than that makes the eye look weighted down.
Rushing the bond tack time. Clusters applied to wet bond slide before setting. Wait the full 30 to 60 seconds.
Pulling clusters off dry. Oil breaks down the bond completely before any mechanical removal. This step is not optional.
Bottom Line
DIY lash clusters are genuinely achievable for beginners. The technique is straightforward, the lash cluster kits are affordable, and the results are close enough to professional extensions that hundreds of thousands of people have stopped paying salon prices entirely.
Two things separate a good first application from a frustrating one: applying with your eyes open, and never skipping sealant. Every other mistake in the common errors list is secondary to those two.
Start with the Mayhug kit ($8 to $12) if you want the lowest entry cost, or the COFIER kit ($10 to $15) if you prefer a more flexible band. If your natural lashes are fine or sparse, start with Ardell Individuals for lighter weight. For more eye technique guides, visit our full eyeliner and lash tutorials.
FAQ
How to apply lash clusters for the first time? Sort your clusters by length before starting. Apply bond to your natural lashes from outer to inner corner and wait 30 to 60 seconds for it to become tacky. Pick up your first cluster with tweezers, start at the outer corner, and press it into the bond with eyes open and looking straight ahead. Work inward. Let bond dry for two minutes, then apply sealant over all the cluster bases. The full step-by-step is in the tutorial section above.
What is the difference between lash bond and lash glue? Strip lash glue is designed to hold for a single wear — a few hours at most. Lash bond is a stronger adhesive formulated for multi-day wear, typically 5 to 10 days when used with sealant. If your DIY lash extensions kit comes with glue labeled for strips, it will not hold clusters for extended wear. Check that your kit specifies bond, not glue.
How long do lash clusters last? With proper bond and sealant application, 5 to 10 days is the typical range. The biggest factors are how thoroughly you cleaned your lash line before application, whether you applied sealant, and whether you use oil-based products near your eyes during wear. Without sealant, most people lose clusters within 24 to 48 hours regardless of how well the bond was applied.
Do lash clusters damage natural lashes? When applied and removed correctly, they don’t cause lasting damage. The main risk is dry removal — pulling clusters off without dissolving the bond with an oil-based remover first is the primary cause of natural lash loss. Applying clusters that are too heavy for fine or sparse natural lashes can also cause stress over time. Start lightweight and work up.
Can I wear mascara with lash clusters? For single-day wear, mascara applied before cluster application is fine. For multi-day wear, skip mascara on the cluster lashes — it breaks down bond faster and makes clusters harder to clean. You can apply mascara to your lower lashes without affecting the clusters.
What’s the best lash cluster kit for beginners? For the lowest entry cost with bond and sealant included, the Mayhug kit ($8 to $12) is the most consistent community recommendation. If you have fine or sparse natural lashes, start with Ardell Individuals instead — they’re lighter weight and available at most drugstores. Both are linked in the product section above.
How do I make my lash clusters last longer? The two highest-impact changes are cleaning your lash line thoroughly with an oil-free cleanser before application, and applying a fresh layer of sealant every two to three days after the initial set. Beyond that: sleep on your back or use a silk pillowcase, avoid oil-based products near your eyes during wear, and stay out of steam and heavy humidity for the first 24 hours after application.

Poll
DIY lash clusters are being sold as the smarter alternative to salon extensions. But is a $14 kit actually giving you the same result, or are we just convincing ourselves it does?
- Same result. I’ve stopped going to the salon and haven’t looked back.
- Close enough. It’s not identical, but the savings make it worth it.
- Not even close. The salon version looks better and I know it.
- The look isn’t the point. Having control over my own routine is.
Why did you vote that way? Drop your take below.