Quick Summary: Strawberry Makeup Tutorial The finished strawberry makeup tutorial look is three products: a sheer pink-rose blush, a berry […]

Quick Summary: Strawberry Makeup Tutorial
- The strawberry makeup tutorial uses three products: a sheer pink-rose blush, a berry tinted lip oil, and a dewy base
- Total drugstore cost runs under $25
- The key technique is blush placed on the apple of the cheek, not the cheekbone
- Dry and normal skin can use the full cream stack; oily skin needs a gel blush swap
- Suitable for complete beginners: one placement rule, no blending complexity

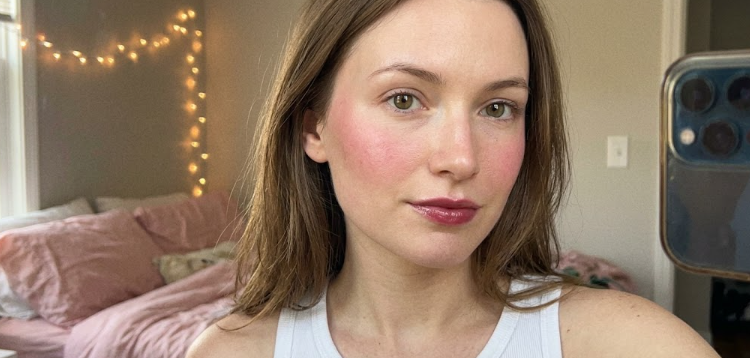
The finished strawberry makeup tutorial look is three products: a sheer pink-rose blush, a berry tinted lip oil, and a dewy base. The total at the drugstore runs under $25. The version you’ve been seeing on TikTok looks like a flush that started from inside the skin, and that’s exactly what it is when the placement is right.
This strawberry makeup tutorial skips contouring, highlighter, and the twelve-step base routine. It works because monochromatic color, meaning the same berry-rose family on your cheeks, lips, and lids, creates cohesion that used to require a full makeup bag. It doesn’t require one now.
One thing worth knowing before you shop: “almost positive that this is my shade, and then it arrives and it’s way more rich and red than it looks online” is one of the most common complaints about blush purchases in this color family. — Reddit, r/swatchitforme. The product section below addresses that directly, including a deeper skin note that most strawberry makeup guides leave out.
Here’s what you need, where each product goes, and how to avoid the mistakes that turn a fresh flush into something that reads more like bruising.
What Is the Strawberry Makeup Look?
The strawberry makeup look is a monochromatic flush in a sheer pink-rose tone. Blush on the apple of the cheek, the same color carried to the lips with a tinted oil, and a dewy base that lets skin texture show through. There’s no contouring and no sculpted cheekbone line. The color family sits firmly in warm pink-rose territory. Not burgundy, not coral, and not the cool mauves that defined the clean girl era.
The difference between strawberry makeup and clean girl makeup comes down to color temperature and placement:
- Clean girl uses cool neutral beige tones, blush on the cheekbone, and a barely-there lip tint. The look reads structured and understated.
- Strawberry makeup uses warm pink-rose tones, blush on the apple of the cheek, and a glossy berry lip. The look reads flushed and warm.
That placement difference is central to this strawberry makeup tutorial. Apple-of-the-cheek blush reads as warmth. Cheekbone blush reads as structure. This tutorial is built on the first approach.
The look surfaced through TikTok’s soft girl aesthetic shift in 2025 and carried into 2026 when drugstore brands released affordable blush and lip oil options that made the full effect accessible without a Sephora trip.
What You Need for the Strawberry Makeup Tutorial
You need three products:
- A cream or gel blush in a sheer pink-rose tone
- A tinted lip oil in a berry-rose shade
- A dewy setting spray or lightweight luminous base
The blush does double duty in this strawberry makeup tutorial. It goes on your cheeks and, if you’re using a multi-stick format, lightly on your lids. The tinted lip oil replaces traditional lipstick entirely. The dewy base or setting spray keeps the skin finish wet enough for the flush to read as natural rather than applied.
A note on shade range before you buy: the products below have been reviewed for fair, light, and medium skin tones. If you have tan, deep, or very deep skin, the Maybelline Cheek Heat in Rose Flash may read too sheer to register on your cheeks. There’s a dedicated deeper skin note in the product section below.
These three products consistently deliver the pink-rose payoff this strawberry makeup tutorial requires at drugstore pricing, and all three are available on Amazon with same-day delivery at most zip codes.
- e.l.f. Monochromatic Multi Stick in Berry ($14)
- Maybelline Cheek Heat Blush in Rose Flash ($12)
- Milk Makeup Cooling Water Jelly Tint in Flushed ($24)
This article contains affiliate links. If you purchase through these links, MakeupTutorials.com may earn a commission at no additional cost to you.
If your skin runs oily or combination: swap the cream blush for a gel or liquid formula. Cream blush layered over a dewy base without a primer underneath will migrate within 90 minutes on oily skin. One lightweight mattifying primer under your base and a gel blush on top keeps the flush in place. The tinted lip oil stays in the routine as-is — it’s a lip product and doesn’t affect face wear.
How to Do the Strawberry Makeup Tutorial Step by Step
Step 1: Prep Your Skin for a Dewy Base
Apply your moisturizer and let it absorb for two minutes before touching any color product. If you’re using a foundation or tinted moisturizer, choose one with a satin or luminous finish. A matte base underneath this strawberry makeup tutorial flattens the flush and kills the skin-visible finish the look depends on.
If you’re skipping foundation entirely, a hydrating SPF or a skin tint works. The goal at this step is skin that looks like skin, with a little light moving across it.
Step 2: Apply Cream Blush to the Apple of Your Cheek
Smile slightly to locate the apple of your cheek. That’s the round, fleshy part that pushes forward when you smile, and that’s where the blush goes in this strawberry makeup tutorial.
Place your finger or a dense brush on the center of the apple and press the product in before you start blending. Blend upward only, toward the top of your cheekbone — not down toward your jaw and not back toward your ear.
Blending down or sweeping toward the ear shifts the flush from apple-centered warmth to something closer to a contour line. The blush should still be visibly centered on the apple when you’re done.
Build the color in two thin layers rather than one heavy application. Sheer pink-rose applied twice reads as a natural flush. The same quantity applied in one pass reads as product on the skin.
Step 3: Dust the Nose Bridge with the Same Blush
Using a small fan brush or your ring finger, apply a light amount of the same blush product down the bridge of your nose. Start between your brows and stop before the tip. The quantity here is much less than your cheek application. You want a hint of pink, not a stripe.
This step is what makes the strawberry makeup tutorial finish read as temperature rather than cosmetic placement. The nose bridge color connects to the cheek flush and makes the whole look read like warmth from within the skin. Without it, the cheek blush sits as an isolated patch of color.
Skin tone guidance for this step:
- Fair and light skin: a barely-there dusting is enough. The nose bridge picks up pigment quickly.
- Medium and tan skin: a slightly heavier hand works well.
- Deep and very deep skin: standard sheer pink-rose formulas may disappear here entirely. A more pigmented formula in the same color family performs better on this step.
Step 4: Apply the Tinted Lip Oil, Center First
Load the lip oil applicator and press it into the center of your lower lip first. Press rather than drag. Then apply to the center of your upper lip and work the color outward toward the lip corners from there.
Center-first application gives you a fruit-stain gradient that reads as natural in this strawberry makeup tutorial. Dragging corner to corner produces even coverage, which looks less like a natural lip flush and more like a standard lipstick application.
The lip oil should match the blush as closely as possible. Berry-rose on the cheeks, berry-rose on the lips. If the shades differ significantly, the monochromatic effect loses its coherence and the look reads as two separate makeup decisions rather than one.
Step 5: Press Multi-Stick Pigment onto Your Lids (Optional)
If you’re using the e.l.f. Monochromatic Multi Stick, press the same berry-rose shade you used on your cheeks onto your upper lid with your ring finger. Press directly onto the lid without dragging. Use about half the amount you applied to your cheeks.
This step completes the monochromatic finish that makes the strawberry makeup tutorial look intentional. Cheek, lip, and lid in the same color family creates visual cohesion without looking heavy or overworked. A soft press and one outward blend at the outer corner is all the blending this step needs.
Skip it if you have hooded eyes and the lid color disappears when your eyes are open. For hooded eyes, the cheek and lip work is sufficient.
Step 6: Set with a Fine Mist and Skip the Powder
Hold a dewy or luminous setting spray 10 to 12 inches from your face and mist once across the full face. Let it dry without touching.
Powder is the one product that will undo this strawberry makeup tutorial. The look depends on skin that reads dewy. A matte setting powder dulls the flush, flattens the lip oil’s gloss, and makes the nose bridge dusting look chalky rather than flushed.
If you need oil control through the day, press a small amount of translucent powder onto your T-zone only and leave your cheeks and lips completely alone.
Strawberry Makeup vs. Clean Girl Makeup: What’s Actually Different?
Both looks share a minimal product count and a preference for letting skin show through. The real split is color temperature and blush placement.
| Strawberry Makeup | Clean Girl Makeup | |
| Color family | Warm pink-rose | Cool beige-neutral |
| Blush placement | Apple of the cheek | Cheekbone |
| Lip finish | Glossy berry tint | Neutral gloss |
| Base finish | Dewy, skin-visible | Skin tint or matte |
| Overall read | Flushed and warm | Sculpted and understated |
The strawberry makeup tutorial runs in the opposite direction from clean girl on every axis that matters. A matte base underneath a strawberry makeup tutorial look works against the aesthetic rather than supporting it, because the flush needs a luminous surface to sit on.
In terms of technique difficulty, both are minimal looks. A clean girl requires precise cheekbone placement. The strawberry makeup tutorial requires precise apple-center placement and restraint on volume. Neither is harder than the other. They just produce different results.
The Best Drugstore Products for the Strawberry Makeup Tutorial Under $15
The affiliate stack above covers the core three. These additional options expand the shade range and offer alternatives if the primary recommendations are out of stock.
Each of these has been reviewed for payoff consistency, wear duration, and shade accuracy in a pink-rose tone. The deeper skin inclusions are here because sheer pink-rose, the standard strawberry makeup tutorial shade recommendation, doesn’t register on tan, deep, or very deep skin tones without a more pigmented formula.
- NYX Smooth Whip Blush in Lavender Sherbet ($10)
- Revlon Kiss Glow Lip Oil in Sheer Pink Berry ($8)
- Wet n Wild MegaGlo Illuminating Powder in Sunset Striptease ($5)
Deeper skin note: On deep or very deep skin, the sheer formulas that appear in most strawberry makeup tutorial product lists will read invisible on the cheeks. Look for “buildable” or “pigmented” in the formula description and stay in the pink-rose color family. The NYX Smooth Whip in Lavender Sherbet and the Saie Dew Blush in Poppy, available at Target, both deliver a visible flush at deeper skin tone ranges. This is a real gap in most drugstore strawberry makeup guides and it’s worth naming directly rather than leaving you to find out at checkout.
Common Strawberry Makeup Tutorial Mistakes
Three mistakes come up repeatedly when this look doesn’t land:
- Using a dark red blush instead of sheer pink-rose. Red-dominant blush on the apple of the cheek reads as bruising on most skin tones. The strawberry makeup tutorial requires pink-rose with warmth, not the depth of a true red. If the blush looks more red than pink in the pan, it’ll read that way on your skin.
- Replacing the tinted lip oil with a matte lipstick. The gloss finish of the lip oil is part of the visual logic of this look. A matte lip in the same color reads as an entirely different aesthetic. If you prefer matte lips, this strawberry makeup tutorial won’t deliver what you’re seeing on TikTok, and that’s worth knowing before you buy.
- Placing blush on the cheekbone instead of the apple. Cheekbone placement creates contour. Apple placement creates a flush. If your blush is sitting close to the outer corner of your eye, move it down and forward toward the center of your face.
Is the strawberry makeup tutorial good for beginners?
Yes. This strawberry makeup tutorial uses three products, one blush placement rule, and no blending complexity beyond a soft upward feather. The skill that matters most centering the blush on the apple rather than the cheekbone is a single placement adjustment. If you’ve applied blush before, you can do this strawberry makeup tutorial on your first try.

Wrapping Up
The strawberry makeup tutorial works because it limits the variables. One blush placement, one color family, one finish type. Once the apple-center placement clicks, the rest of this strawberry makeup tutorial follows naturally.
A few things worth carrying forward:
- Dewy base is non-negotiable. Matte underneath kills the flush.
- The nose bridge dusting is the step most tutorials skip. It’s also the step that makes the biggest difference.
- If you’re shopping for deeper skin tones, the standard sheer pink-rose formulas won’t show up. Go pigmented and stay in the same color family.
The products in the affiliate stacks above cover the full look at under $25. If you want to go deeper on the base work that makes this look perform, the dewy skin tutorial covers prep in full detail. For more blush-forward looks in the same category, the cream blush application guide is the next step.
FAQ
What blush color gives you the strawberry flush look?
You need a sheer pink-rose tone with warmth. In the pan, the blush should look clearly pink with a warm or neutral undertone. Anything leaning coral or burgundy will push the strawberry makeup tutorial finish in the wrong direction.
What’s the difference between strawberry makeup and clean girl makeup?
Color temperature and blush placement. Clean girl uses cool neutrals and cheekbone blush for a sculpted look. The strawberry makeup tutorial uses warm pink-rose tones and apple blush for a flush look. Both are minimal looks that produce different results.
Can you do the strawberry makeup tutorial without a multi-stick?
Yes. The multi-stick makes the optional lid step easier, but you can complete this strawberry makeup tutorial with a separate cream blush and a tinted lip oil and skip the lid step entirely. The cheek and lip combination is the core of the look.
Does the strawberry makeup tutorial work on oily skin?
It does, but the formula stack needs one adjustment. Swap the cream blush for a gel or liquid formula and apply a lightweight mattifying primer under your base before you start. Cream blush over a dewy base without primer migrates on oily skin within 90 minutes. The tinted lip oil stays in the routine as-is. With that one swap, the strawberry makeup tutorial holds on oily skin through a full day.
How do you make the strawberry flush last longer?
Two things extend wear on this strawberry makeup tutorial more than anything else. First, press your blush in layers rather than applying it all at once — pressed pigment grips better than a single heavy swipe. Second, skip setting powder on your cheeks entirely and use a fine mist of setting spray over the finished look instead. Powder absorbs the cream formula and shortens wear; the mist locks it without dulling the finish.
Can you do the strawberry makeup tutorial on mature skin?
Yes, with one adjustment at the base step. Choose a skin tint or lightweight luminous foundation rather than a full-coverage formula. Heavy coverage underneath tends to settle into fine lines, which works against the fresh-skin finish this look needs. Cream blush on mature skin performs better than powder blush for the same reason — it sits on top of texture rather than collecting in it. The rest of the strawberry makeup tutorial steps apply without modification.
What’s the difference between strawberry makeup and peach makeup?
The color family. Peach makeup sits at the intersection of pink and orange, which reads as warm but leans golden on the skin. Strawberry makeup stays firmly in the pink-rose family with no orange pull. On fair and light skin tones, the difference is subtle in the pan but visible on the face. On medium and deeper skin tones, peach tends to read more bronze while the strawberry makeup tutorial palette reads as a cooler, cleaner pink flush. If your blush looks warm but slightly orange rather than warm and pink, you’re working with a peach formula.
Revised Poll
The strawberry makeup look is built on looking naturally flushed. But you’re using three products to fake warmth your skin doesn’t have. Is that meaningfully different from contouring — or is “natural flush” just contouring with better PR?
- It’s different. Enhancing something that could be there is not the same as sculpting something that isn’t.
- It’s not different at all. It’s still performing a version of your face that doesn’t exist without the products.
- The distinction only matters if you think makeup needs to justify itself in the first place.
Why did you vote that way? Drop your take below.